Intricate jewelry work requires more than just a table; it requires a specialized instrument for your workshop.
If you are currently working on a standard desk, you are fighting against your posture and losing valuable metal filings every single day.
Project Blueprint Details
Stop guessing measurements. Get the exact cut lists and 3D diagrams to finish this project without mistakes.
ACCESS COMPLETE PROJECT VAULT >>Stop Chasing Perfection on a Wobbly Surface
Attention: Stop straining your neck and back by hunching over a surface that was never meant for jewelry making.
A standard table is too low for the precision required in soldering, filing, and stone setting, leading to chronic fatigue and errors.
Interest: Imagine a workspace designed specifically for the human body and the art of the goldsmith.
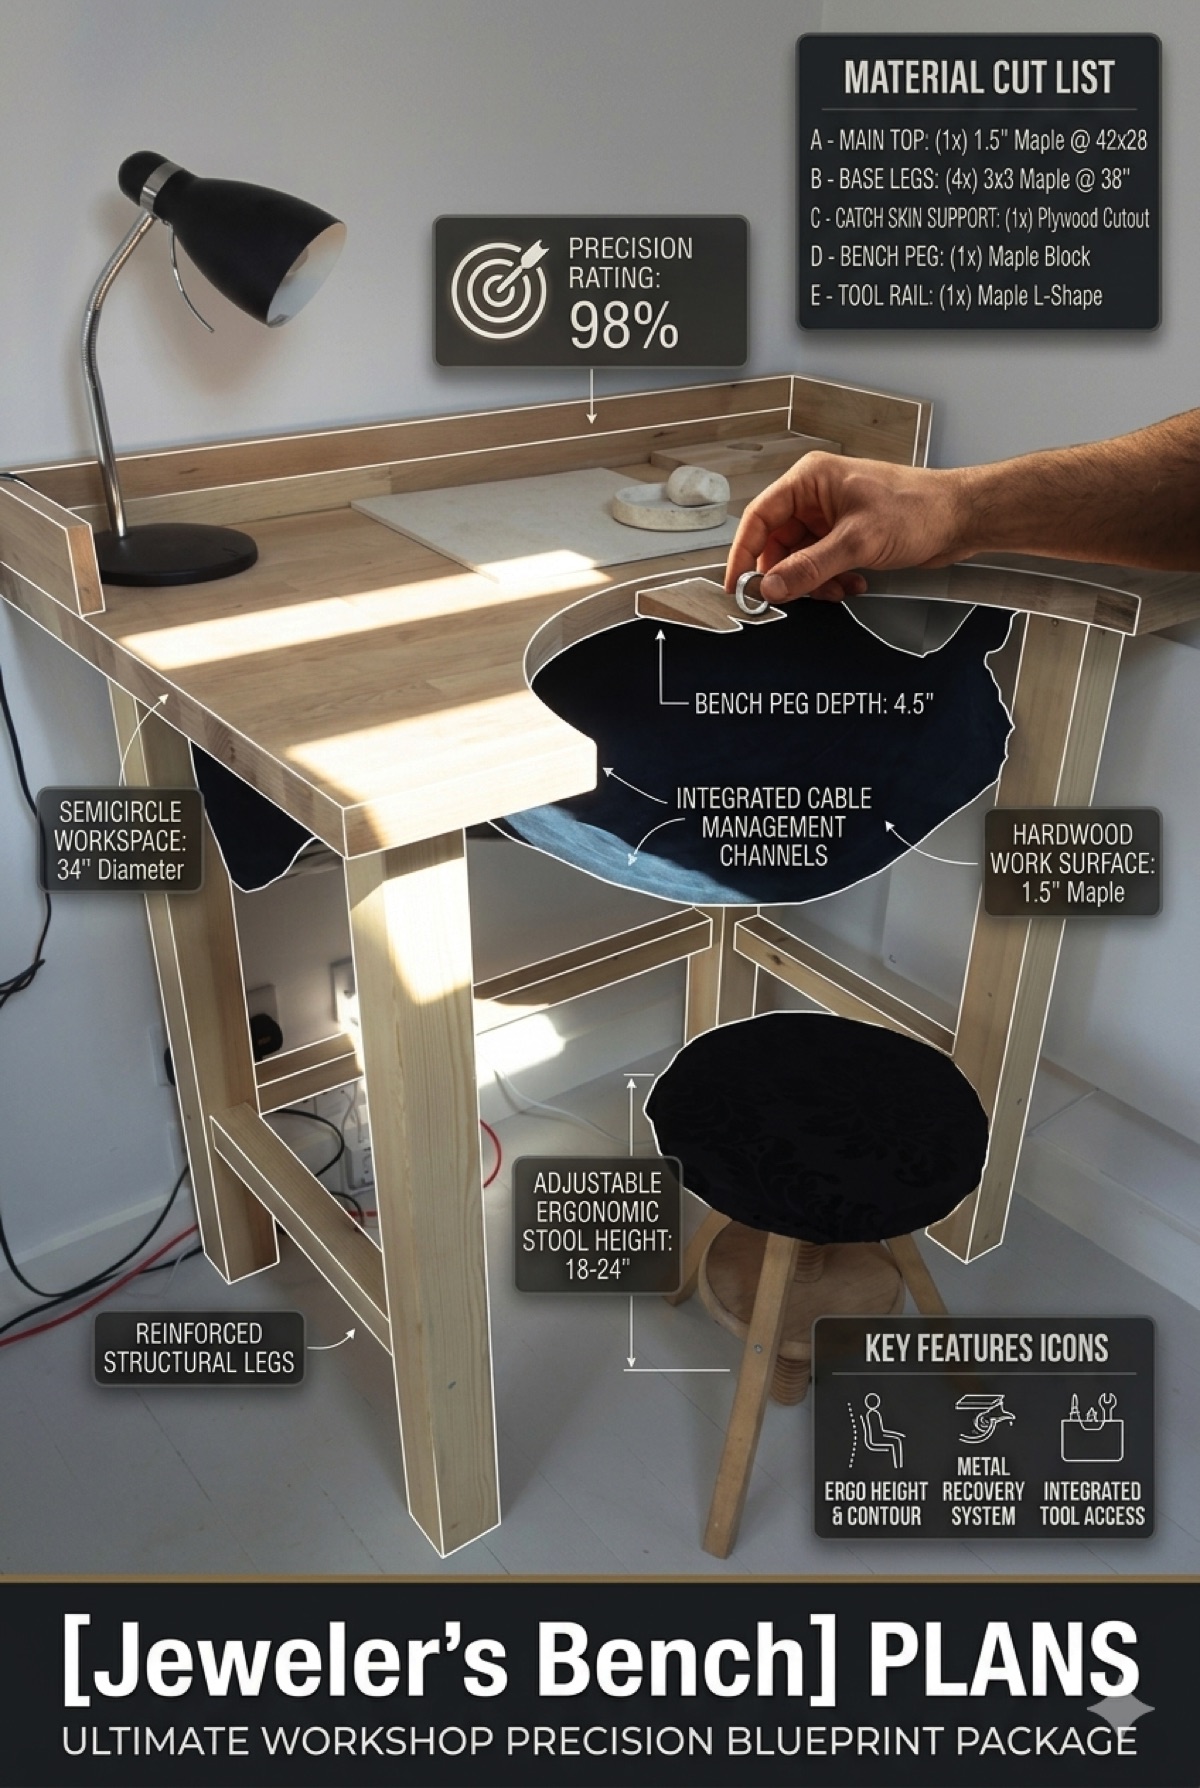
Imagine an ergonomic semi-circle cutout that brings you closer to your work, an integrated leather catch skin that saves every milligram of precious metal, and a rock-solid bench peg that provides the perfect leverage for every cut.
This isn’t just a simple desk; it is a professional-grade Jeweler’s Workbench, a precision-engineered hub designed to elevate your artistry to a gallery-ready standard.
Desire: Our team spent months analyzing the workflows of master jewelers to create this Precision Shop Blueprint Package.
This design features a specialized 38-inch height for perfect eye-level visibility and a reinforced hardwood frame that eliminates the tiny vibrations that cause setting errors.
You deserve a bench that protects your body, organizes your specialized tools, and pays for itself by catching the “sweeps” and scraps that usually vanish onto the floor.
Action: Don’t let another project suffer from poor ergonomics—transform your craft this weekend.
Click below to download the full blueprint and start building the bench that will support your career for the next twenty years.
Why This Ergonomic Hub Outperforms Standard Desks
When you analyze a professional jewelry studio, you find that success is built on three pillars: height-specific ergonomics, material recovery, and structural rigidity.
Standard furniture is designed for writing, but this bench is designed for high-leverage tasks like sawing and filing at eye level.
By utilizing a semi-circle cutout and a soft leather “bench skin,” you create a natural bowl that catches runaway gemstones and valuable filings before they hit the ground.
Keeping your workspace at the optimal 95-100cm height ensures you remain upright, protecting your spine and allowing for hours of focused, precision work without discomfort.
The heavy-duty hardwood frame and mortise-and-tenon joinery provide the absolute stability required for delicate tasks like pavé setting or intricate wax carving.
Build Your Master Bench in 7 Steps
| Step | Action Item | Pro-Tip |
|---|---|---|
| 1 | Material Selection | Use high-density Beech or Maple for the top to ensure a heavy, vibration-free surface. |
| 2 | The Cutout | Carefully route the semi-circle front section to allow you to “sit into” the workbench. |
| 3 | Leg Assembly | Build extra-thick legs with wide cross-bracing to prevent any lateral movement or rocking. |
| 4 | Bench Peg Install | Center your hardwood bench peg at the apex of the cutout for maximum leverage while sawing. |
| 5 | Leather Catch Tray | Install the high-quality leather “skin” or catch tray to recover 100% of your metal filings. |
| 6 | Tool Railing | Add the protective lip around the edges to prevent small tools or round beads from rolling off. |
| 7 | Lighting & Power | Mount a high-intensity flexible lamp and power strip directly to the back rail for clear visibility. |
PRO-TIP: The Eye-Level Rule
The most common mistake is building a jewelry bench too low.
Sit in your adjustable chair and measure from the floor to your chest; the bench surface should be at this height.
This allows you to work with your elbows tucked in and your piece directly in front of your eyes, drastically improving your control.
A Blueprint Designed for Lifetime Durability
Building this bench is an investment in the longevity of your workshop and your physical health.
The building drawing package focuses on the professional standards of high-end jewelry manufacturing.
Every dimension in this plan has been optimized to ensure that your bench peg is at the perfect angle for the most common filing tasks.
We have included a specific section for “sweeps” management because reclaiming precious metal is the fastest way to increase your profit margins.
The internal frame bracing system ensures that even when you are using a heavy-duty ring stretcher or vise, the bench remains completely motionless.
This means you can focus 100% of your attention on the metal, without worrying about the table shifting or sagging.
The rear tool railing is deep enough to store your pliers, hammers, and burr sets within an arm’s reach without cluttering the main work area.
This design is modular, allowing you to add specialized drawers or a soldering station on either side as your business grows.
We recommend finishing the hardwood with a natural oil to maintain the grip of the wood while making it easy to wipe away polishing compounds.
By the time you complete this project, you will have a workstation that feels like a natural extension of your own hands.
Frequently Asked Questions
Why do I need a leather catch skin instead of a wooden tray?
Leather is soft and pliable, which prevents gemstones from bouncing out and allows you to easily funnel filings into a jar.
It also withstands the heat of accidental drops from your soldering torch better than many other materials.
What is the best height for the bench peg?
The bench peg should be positioned so that when you are sawing, your arm is at a comfortable 90-degree angle while you look straight ahead at the piece.
Can I use 2x4s for the frame instead of hardwood?
You can use construction lumber for the legs, but we strongly recommend a hardwood top to ensure the density needed for stability.
How do I mount my jewelry vise to this bench?
The blueprint includes a reinforced mounting point specifically designed for GRS or heavy-duty bench-mounted vises.
Is the semi-circle cutout necessary for beginners?
Yes, it is the most important ergonomic feature of a jeweler’s bench as it provides support for your arms while working close to your face.
Take Command of Your Craft Today
Stop letting a standard desk limit the precision of your jewelry and the health of your body.
Our team has spent hours perfecting this ergonomic design so you can focus on the art of making, not the frustration of a poor setup.
Get the complete Jeweler’s Workbench Plans: Precision Shop Blueprint Package and join the ranks of professional makers.
This package includes the full Material-Matrix, the Cost-Calculator, and high-resolution assembly drawings for a perfect build.
Everything you need to succeed is included in this professional blueprint.
[DOWNLOAD THE FULL BLUEPRINT PACKAGE NOW]
Project Blueprint Details
Stop guessing measurements. Get the exact cut lists and 3D diagrams to finish this project without mistakes.
ACCESS COMPLETE PROJECT VAULT >>


No Comments
Be the first to start a conversation