DIY Workbench Outfeed Table Plans – Heavy Duty Table Saw Extension
Your table saw is the heart of your workshop, but it is incomplete without a proper support system.
Working with large sheets of plywood or long boards without adequate support is not just difficult; it is dangerous.
Stop Struggling with Heavy Boards and Start Building with Precision
Stop risking kickback and uneven cuts because you lack the surface area to support your material properly.
A small table saw surface is a major limitation that forces you to compromise on both safety and the quality of your finish.
Imagine a workshop where every rip cut is effortless because your material glides onto a perfectly leveled, massive outfeed deck.
Imagine a multifunctional workstation that doubles as a rock-solid assembly table, featuring integrated T-tracks and heavy-duty storage.
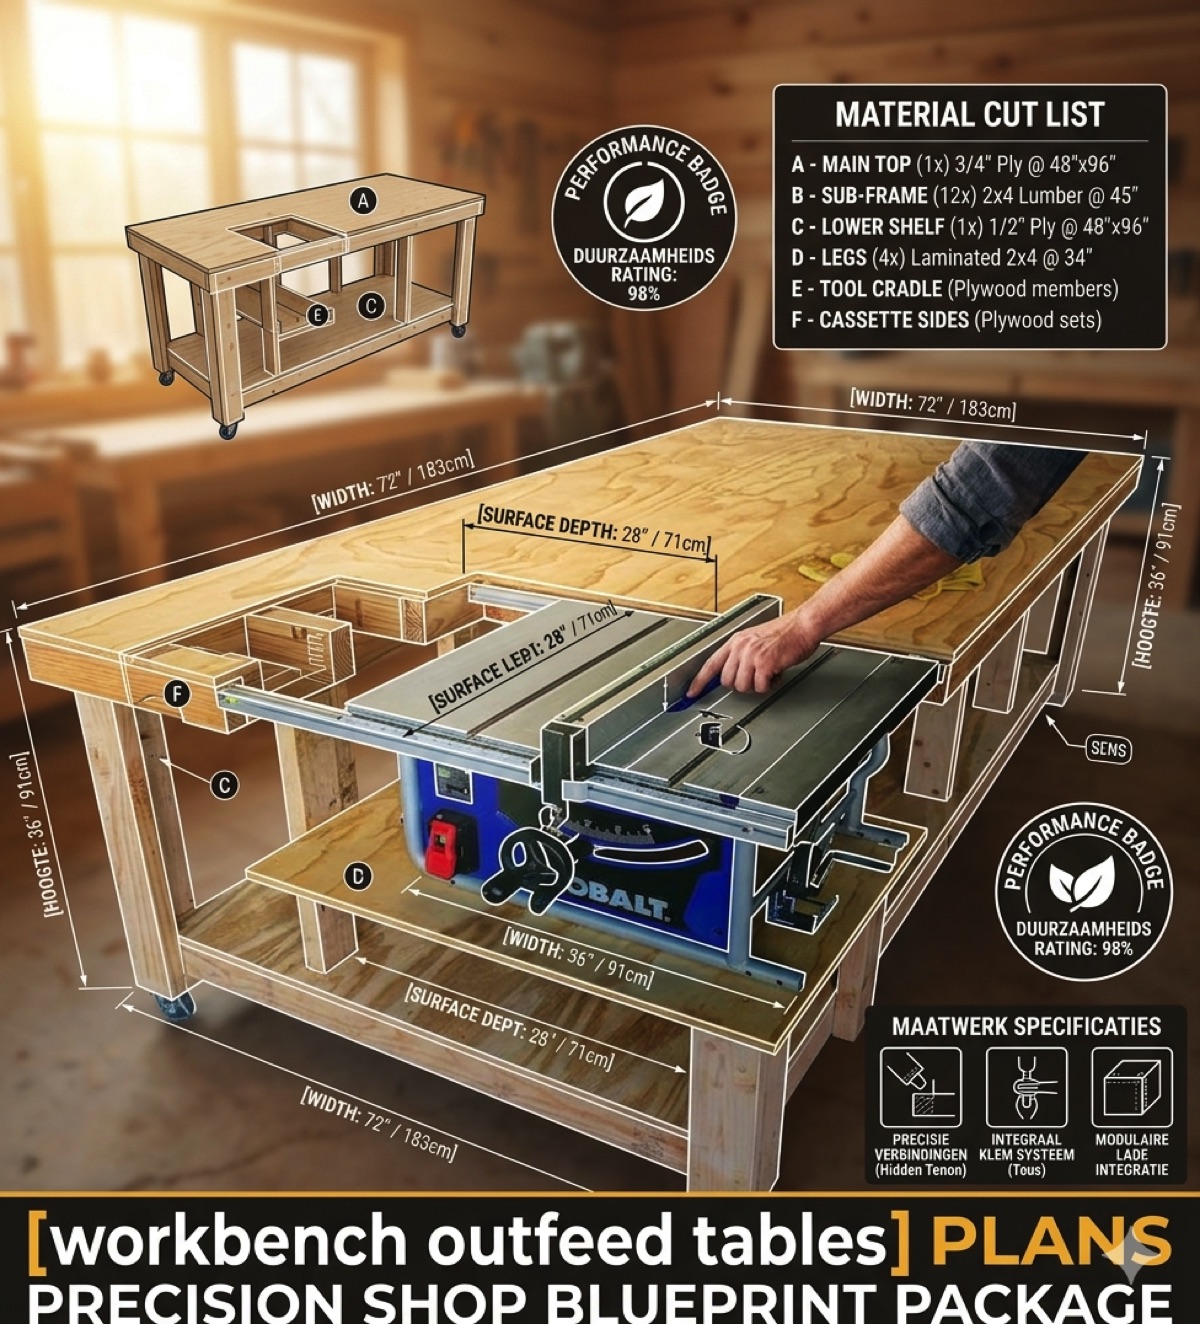
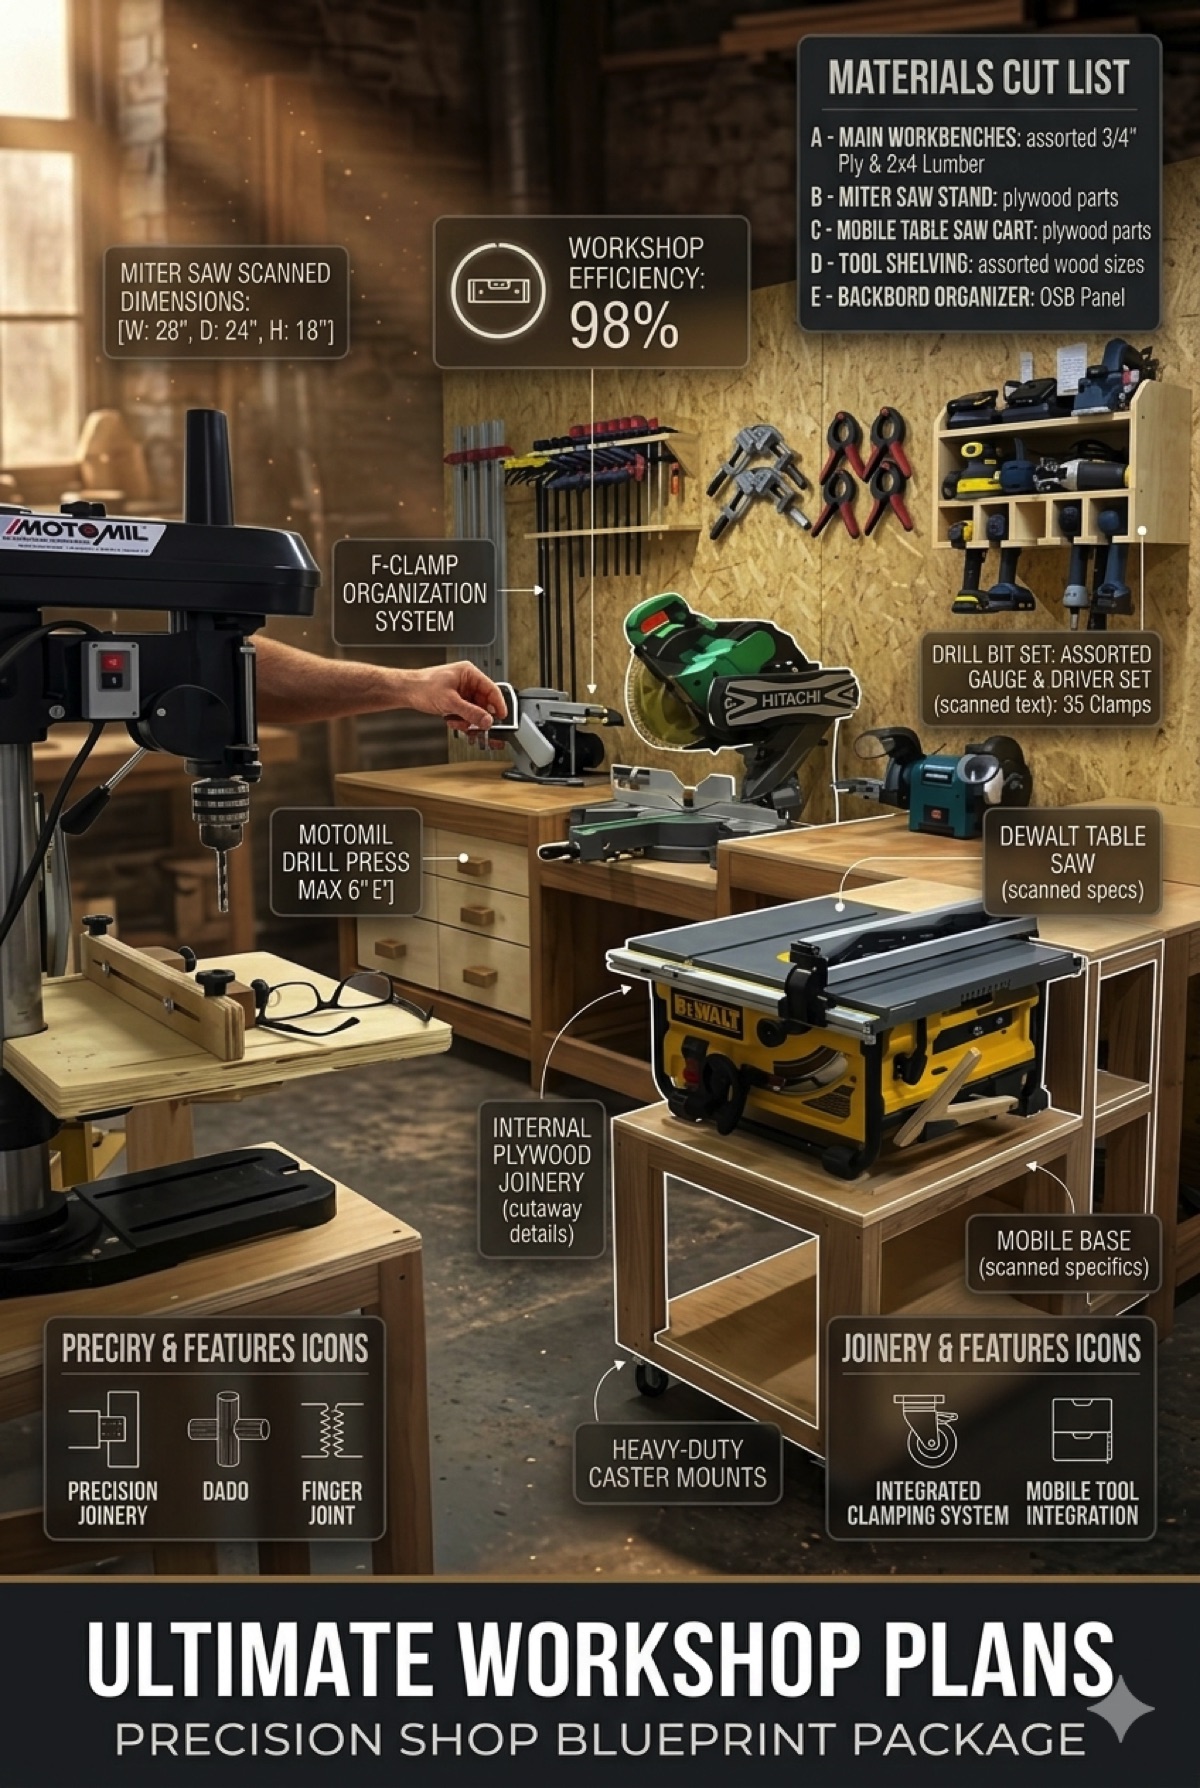
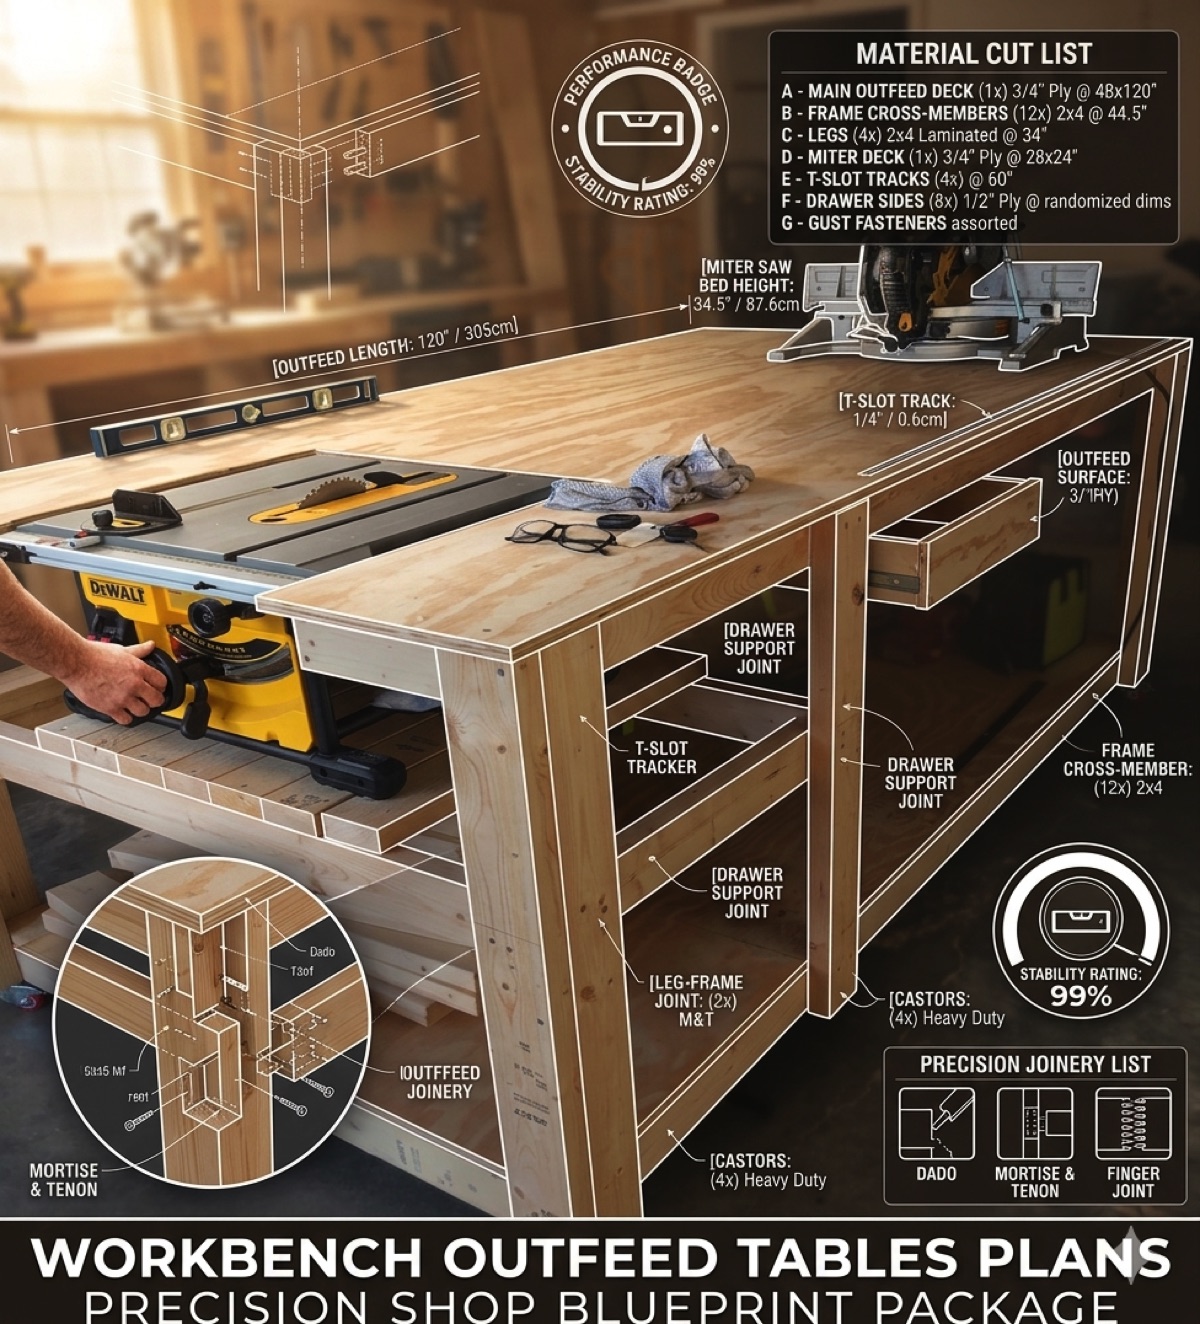
This isn’t just a simple stand; it is a professional-grade system built from these Workbench Outfeed Table Plans, a precision-engineered extension of your most vital tool.
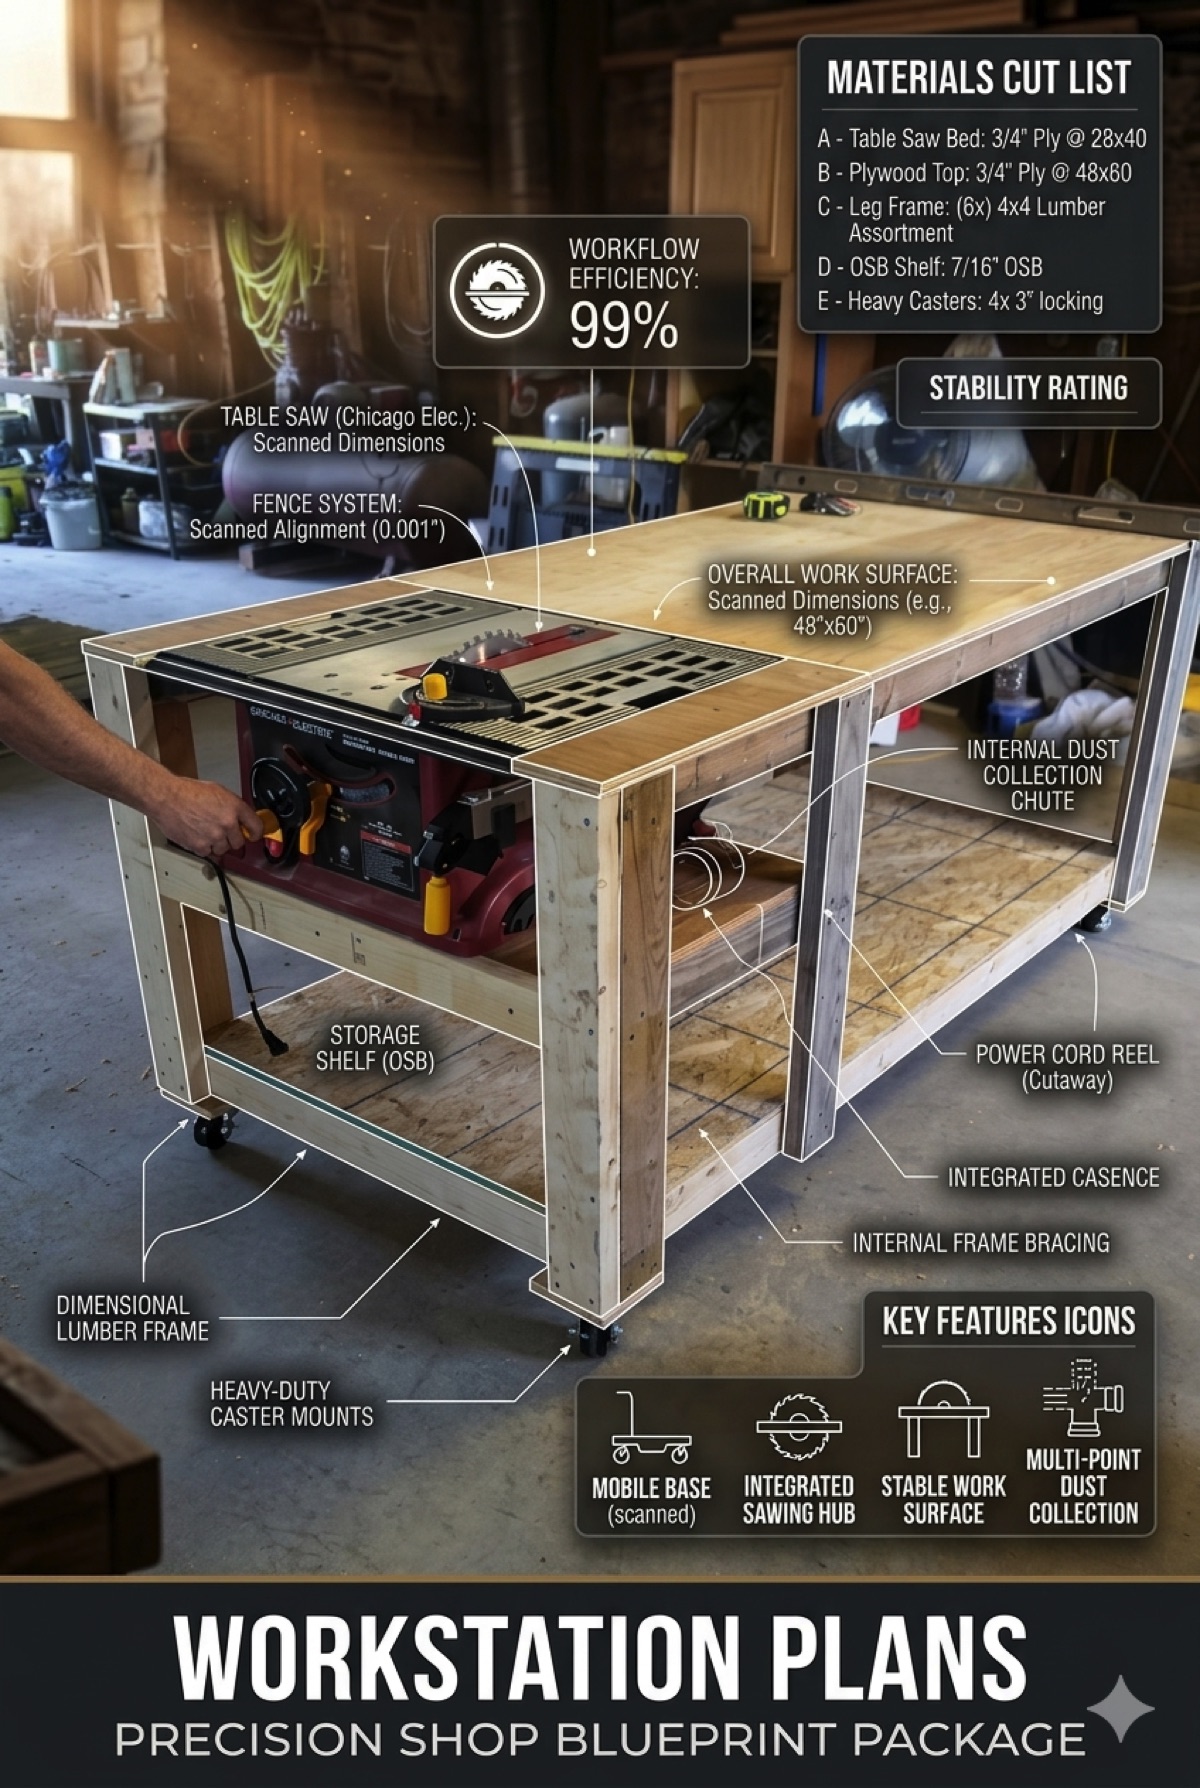
Our team spent months optimizing this design to ensure it provides 99% stability while remaining perfectly flush with your saw’s cast iron top.
This blueprint features reinforced mortise and tenon joinery and a modular internal structure that eliminates sagging and vibration.
You deserve a shop environment where you can handle full 4×8 sheets alone with total confidence and professional precision.
Don’t let safety hazards and limited space hold back your craft—upgrade your shop foundation today.
Click the button below to download the full blueprint package and build the ultimate outfeed support system.
The Science of a Perfect Outfeed Surface
In a high-performance woodworking shop, the outfeed area must satisfy three critical requirements: level accuracy, structural mass, and friction-free movement.
If your outfeed table is even a fraction of a millimeter too high, your wood will catch and ruin your cut.
These Workbench Outfeed Table Plans include a precision calibration system that ensures your deck remains dead-level with your saw’s miter slots.
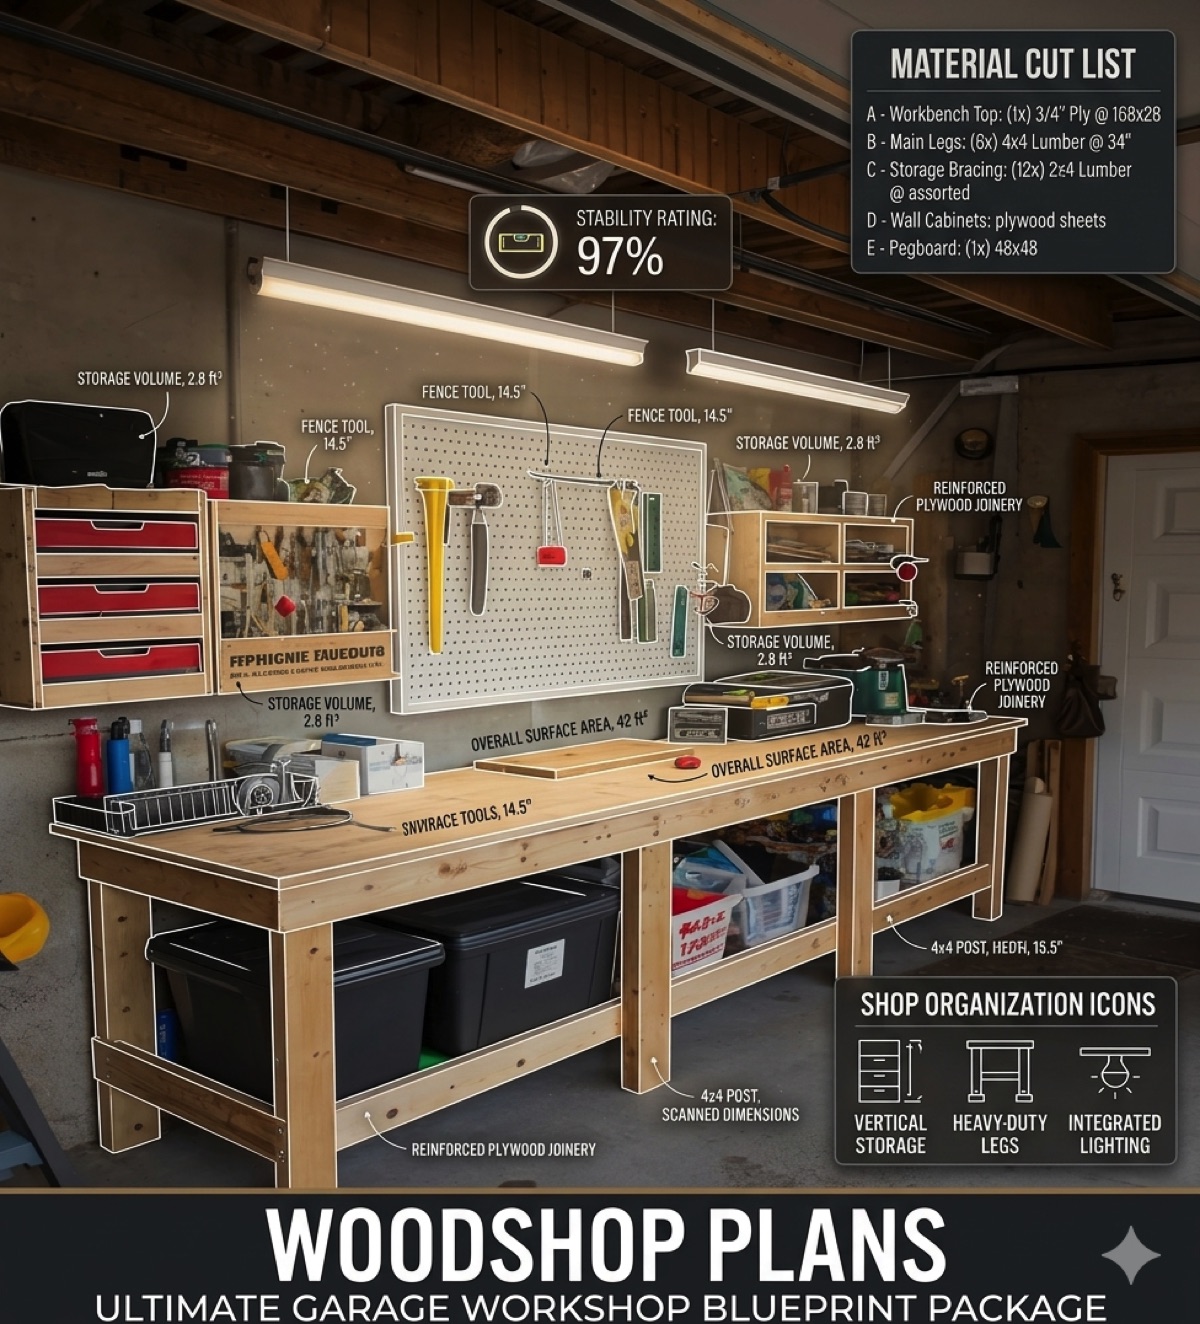
The massive 4×4 leg construction provides the vibration-dampening mass required for industrial-grade stability during heavy assembly.
By utilizing a high-density 3/4″ plywood top with a smooth finish, you ensure your workpieces glide without resistance.
The integrated T-slot tracks move the utility of your bench from a simple table to a complex clamping and jig-hosting station.
Maintaining a clear path behind your saw is the single best way to improve your workshop’s overall safety rating.
A stable outfeed surface prevents the workpiece from tipping at the end of a cut, which is the leading cause of dangerous kickback incidents.
When the material is fully supported, you can maintain constant pressure against the rip fence, resulting in straighter, cleaner cuts.
Build Your Professional Outfeed Hub in 7 Steps
| Step | Action Item | Expert Pro-Tip |
|---|---|---|
| 1 | Foundation Setup | Use kiln-dried lumber for the main frame to ensure the table never twists or moves out of level. |
| 2 | Joinery Execution | Cut your mortise and tenon joints with a tight friction fit to provide maximum lateral rigidity. |
| 3 | Table Saw Integration | Measure the exact height of your saw’s deck including any mobile bases before finalizing leg lengths. |
| 4 | Lower Deck Install | Mount the bottom storage shelf early to act as a massive structural brace for the entire unit. |
| 5 | Miter Slot Routing | Route miter slot extensions exactly aligned with your saw to allow your miter gauge to pass through. |
| 6 | T-Track Mounting | Install recessed T-tracks for versatile clamping options during large-scale project assemblies. |
| 7 | Final Leveling | Use heavy-duty adjustable casters or leveling feet to dial in the final “perfect flush” alignment. |
PRO-TIP: The Miter Slot Alignment Secret
When routing the miter slot extensions into your outfeed table, use your saw’s own miter gauge as a guide.
By clamping a straight edge exactly parallel to your saw’s slots, you ensure your gauge never binds when finishing a cut.
This small detail is what separates a homemade stand from a professional-grade shop extension.
Engineered for Stability and Workflow Efficiency
Building this outfeed system is about creating a safer and more productive environment for your woodworking.
The building drawing package focuses on the professional standards of high-end commercial cabinetry shops.
Every dimension in these Workbench Outfeed Table Plans has been calibrated to provide maximum outfeed length without obstructing shop traffic.
We have included specific details for the reinforced “Hidden Tenon” joints that give this bench its 99% stability rating.
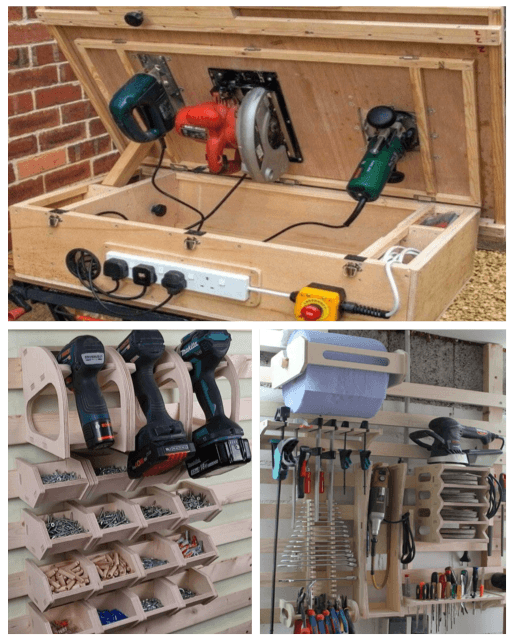
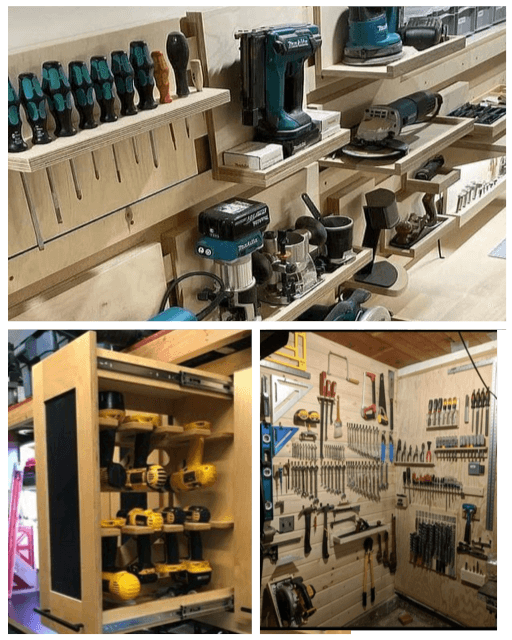
The internal tool cradle design allows you to store your most-used accessories right where they are needed.
This means you spend less time walking across the shop and more time focusing on your joinery.
The heavy-duty caster integration allows you to move this massive unit easily when you need to reconfigure your shop layout.
This design is optimized for both professional makers and hobbyists who want to take their shop to the next level.
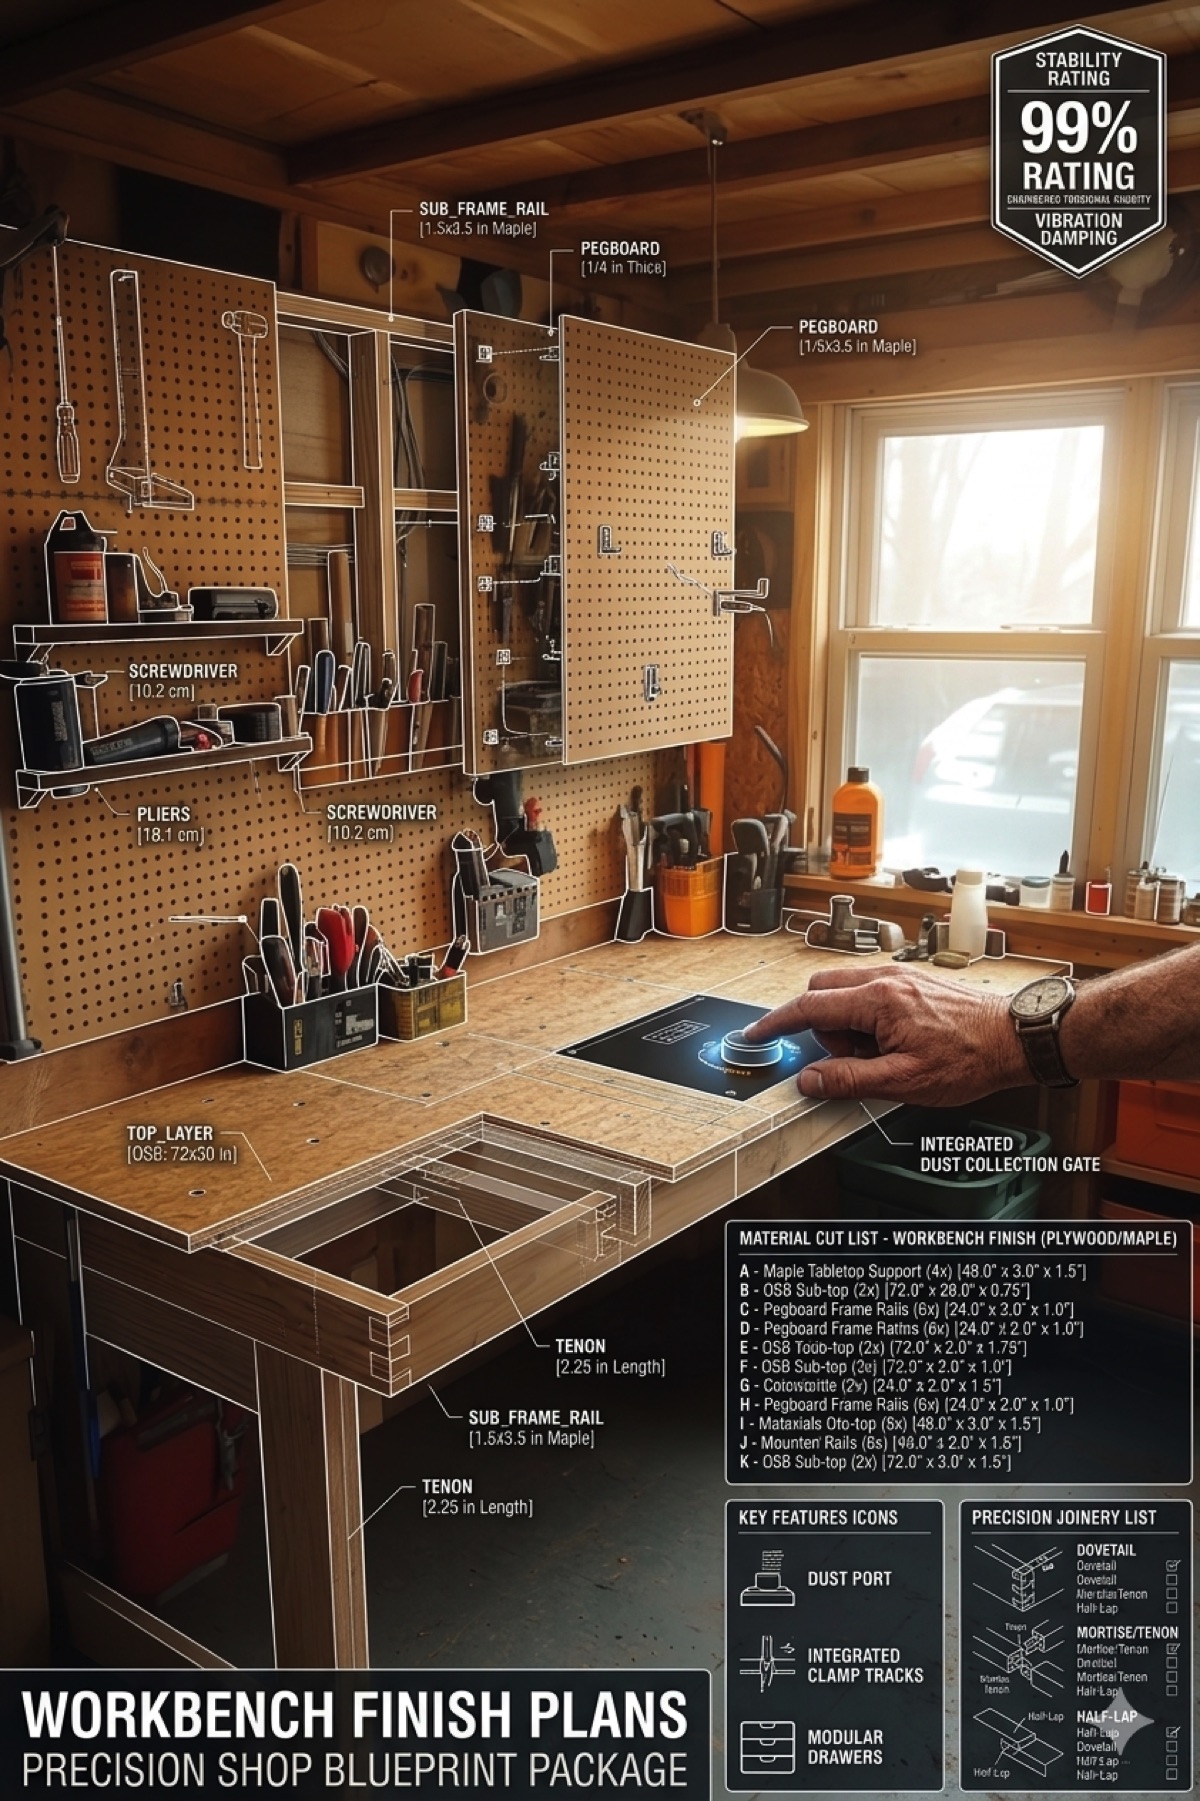
We recommend a multi-layered plywood top with a hardwax-oil finish for the best balance of durability and glide.
By the time you complete this project, you will have a workstation that is the envy of every woodworker who visits your shop.
The versatility of the outfeed deck makes it the perfect surface for large-scale sanding, finishing, and dry-fitting cabinets.
Having a dedicated space for assembly means your primary workbench stays clear for detail work.
Frequently Asked Questions
How do I ensure the table is perfectly flush with my saw?
Our blueprints include a dedicated section on using adjustable leveling feet to compensate for uneven garage floors.
Can I build this for a jobsite saw like a DeWalt or Bosch?
Yes, the plans are modular and include specific height adjustments for both cabinet saws and portable jobsite models.
Will the miter slots weaken the work surface?
No, the sub-frame is engineered to provide support directly beneath the routed slots to maintain total surface integrity.
What is the best material for the top deck?
We highly recommend 3/4″ Baltic Birch plywood for its density and flatness, topped with a sacrificial layer if needed.
Is it difficult to move such a heavy table?
Not with the specified heavy-duty locking casters; the table remains rock-solid when locked but glides easily when released.
Master Your Workshop Layout Today
Stop letting a cramped and dangerous saw setup limit the size and quality of your woodworking projects.
Our team has perfected this high-stability design so you can build larger, safer, and with more precision than ever before.
Get the complete Workbench Outfeed Table Plans: Precision Shop Blueprint Package and build the shop you deserve.
This package includes the full Material-Matrix, the Cost-Calculator, and high-resolution assembly drawings.
Everything you need for a professional-grade workshop foundation is included in this comprehensive blueprint.
[DOWNLOAD THE FULL BLUEPRINT PACKAGE NOW]
Elevate Your Maker Environment: The Path to Workshop Perfection
Building a high-quality outfeed system is a major milestone in a journey toward professional-grade craftsmanship.
A workspace that evolves with your skills is the hallmark of a master maker who understands the value of time, safety, and precision.
Once you have mastered the basics of a stable frame, you can begin to integrate more specialized stations into your shop environment.
For those who demand the absolute peak of heavy-duty performance, we recommend exploring the Ultimate Professional Workbench.
This design acts as the primary anchor for any serious workshop, providing the mass needed for intense hand-tool work and assembly.
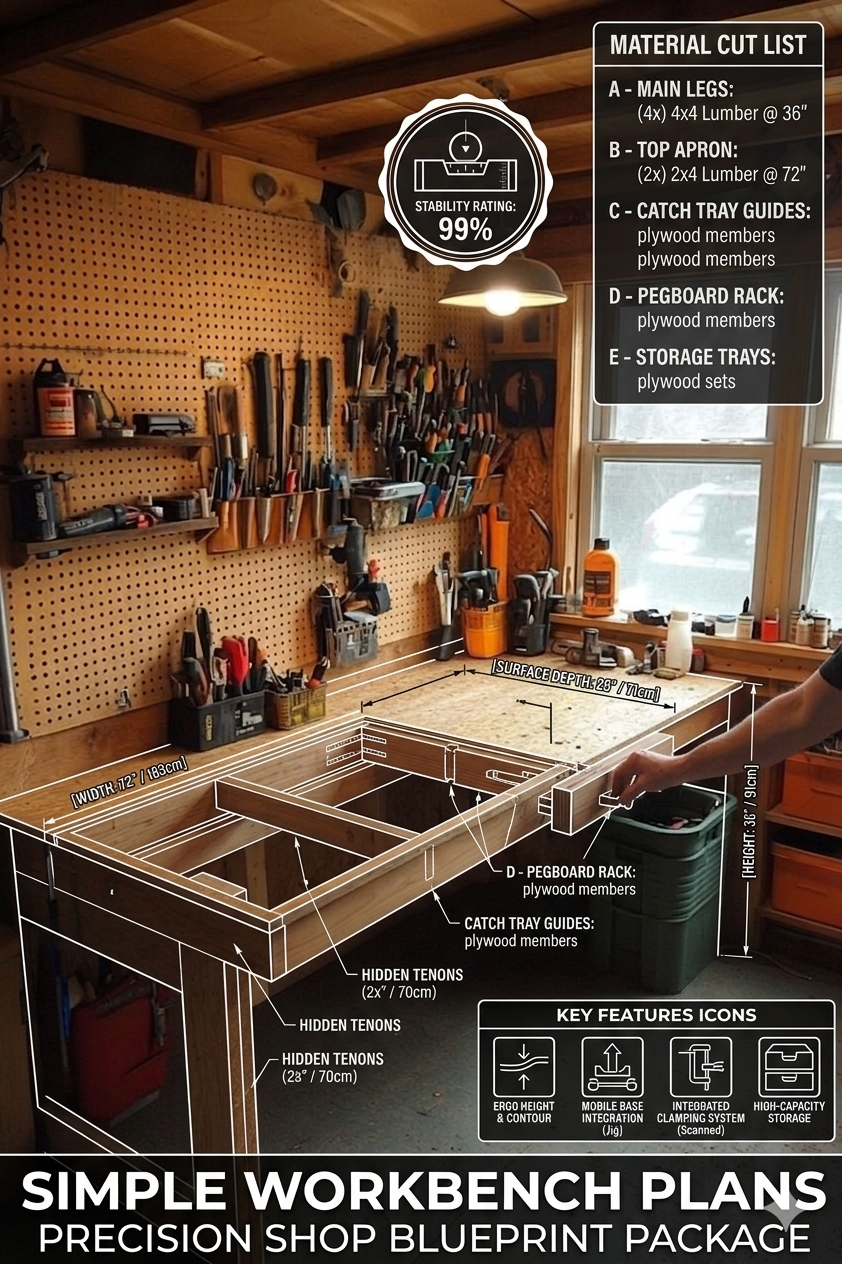
If you are just starting out or need a secondary station, our Simple Workbench Plans offer a rock-solid foundation without unnecessary complexity.
For woodworkers with shifting needs, the Workshop Workbench Plans provide the flexibility required for a dynamic garage layout.
Specialized Hubs for Every Woodworking Discipline
A truly efficient shop is not just one large table, but a series of interconnected hubs designed for specific, high-performance tasks.
The Workbench Outfeed Table you have just explored is the key to unlocking safe, large-scale production.
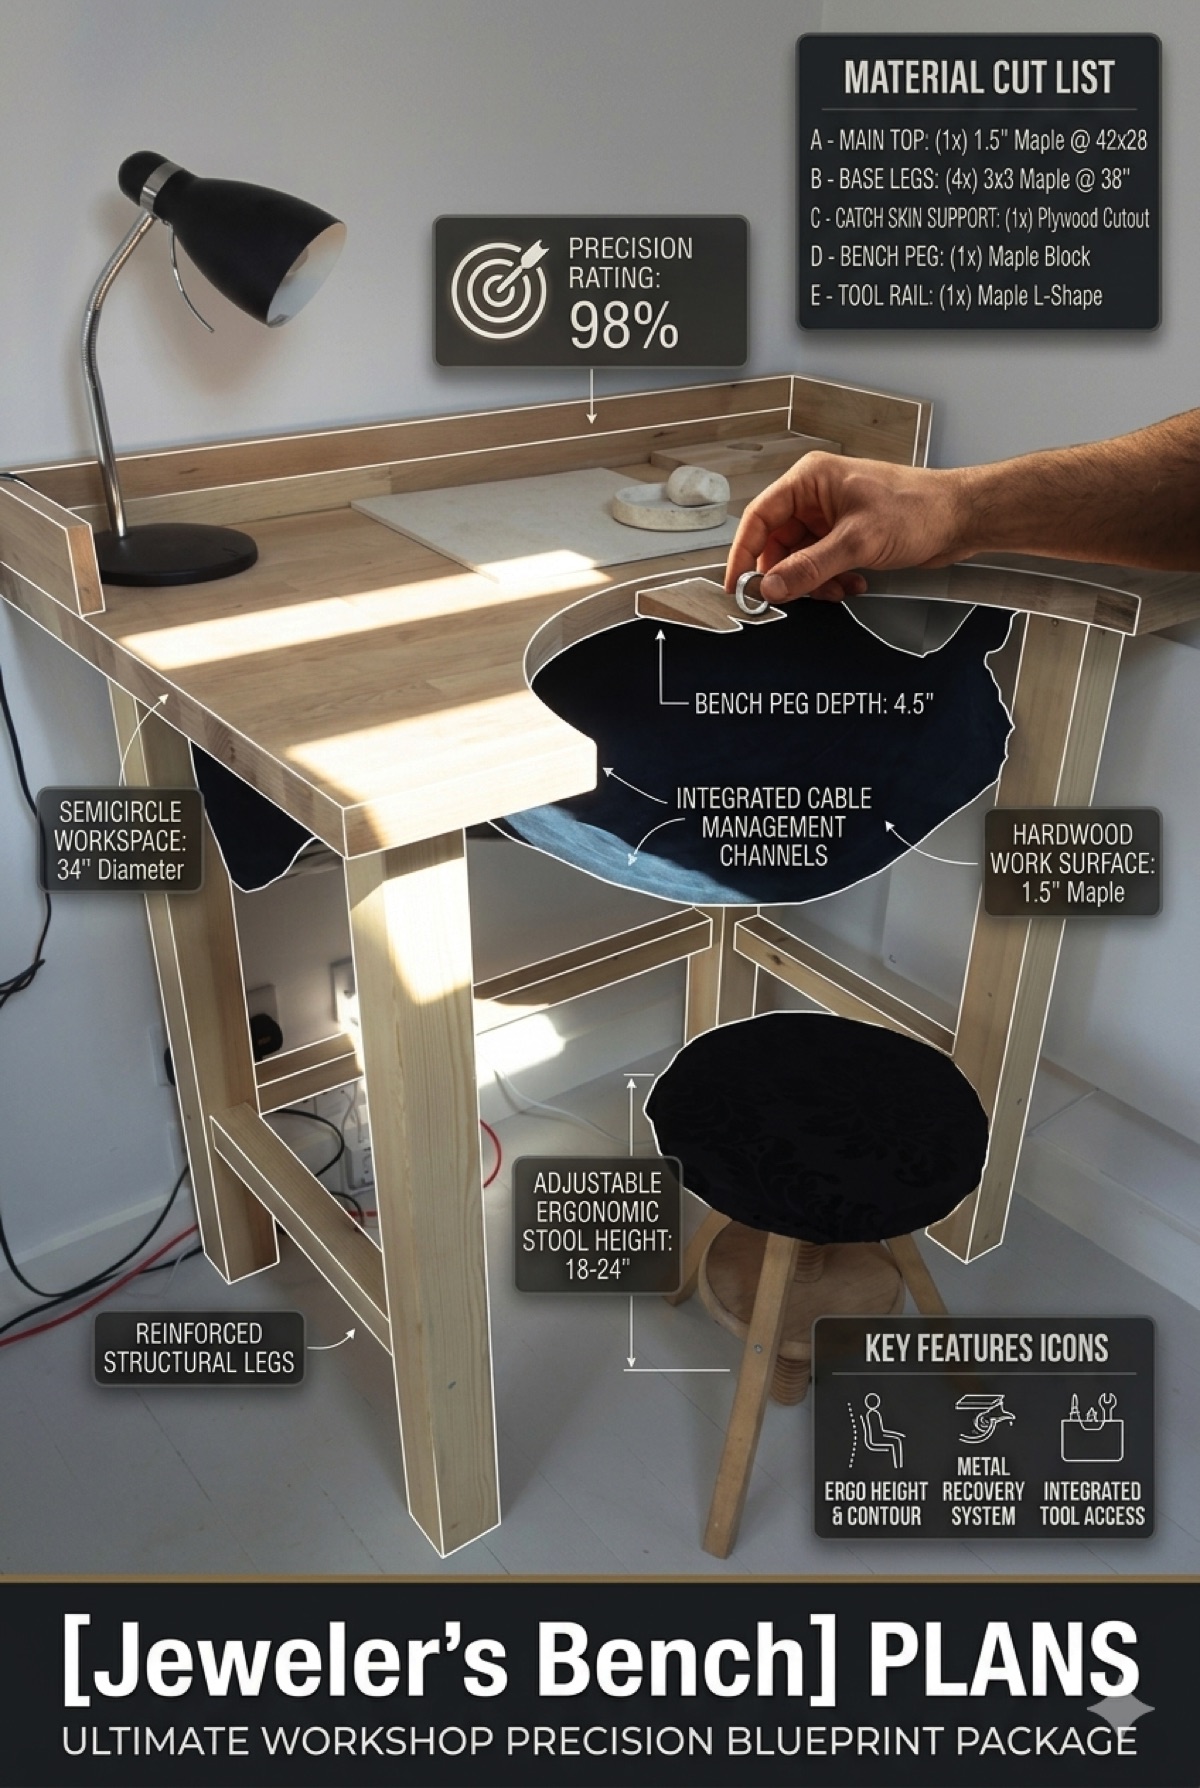
If your work requires extreme precision or intricate assembly, a dedicated Jeweler’s Workbench Blueprint offers the specialized ergonomics you need.
For the modern power-tool user, managing equipment and battery power is a constant battle against clutter and downtime.
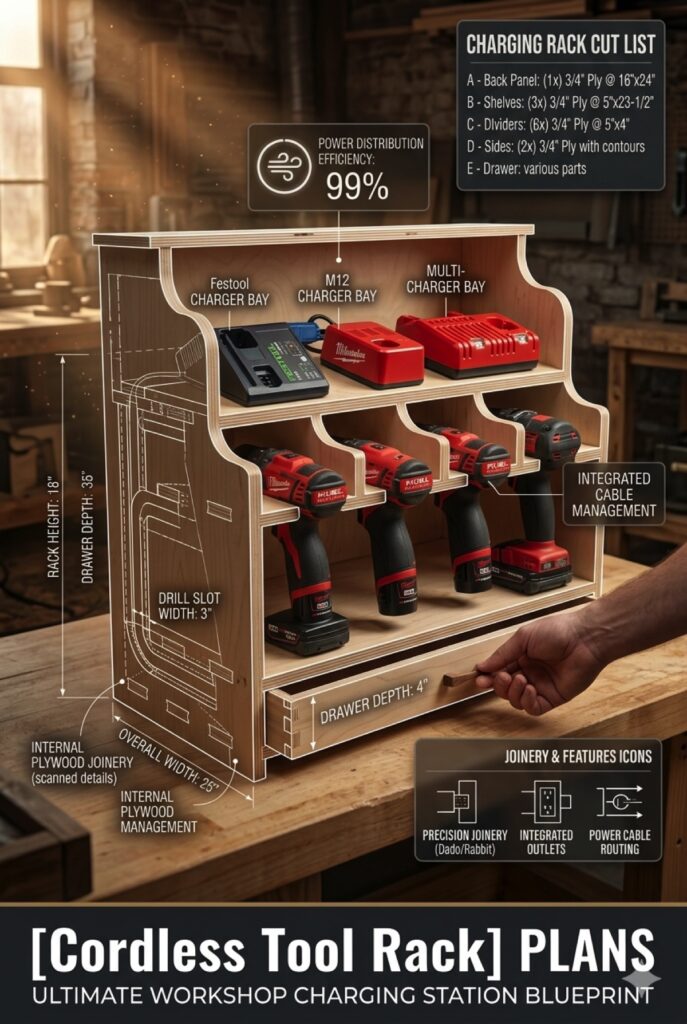
You can streamline your workflow and keep your surfaces clear by installing a dedicated Cordless Tool Charging Station.
Furthermore, handling large sheet goods becomes a safer, one-person operation when you integrate a Mobile Saw Hub into your table saw setup.
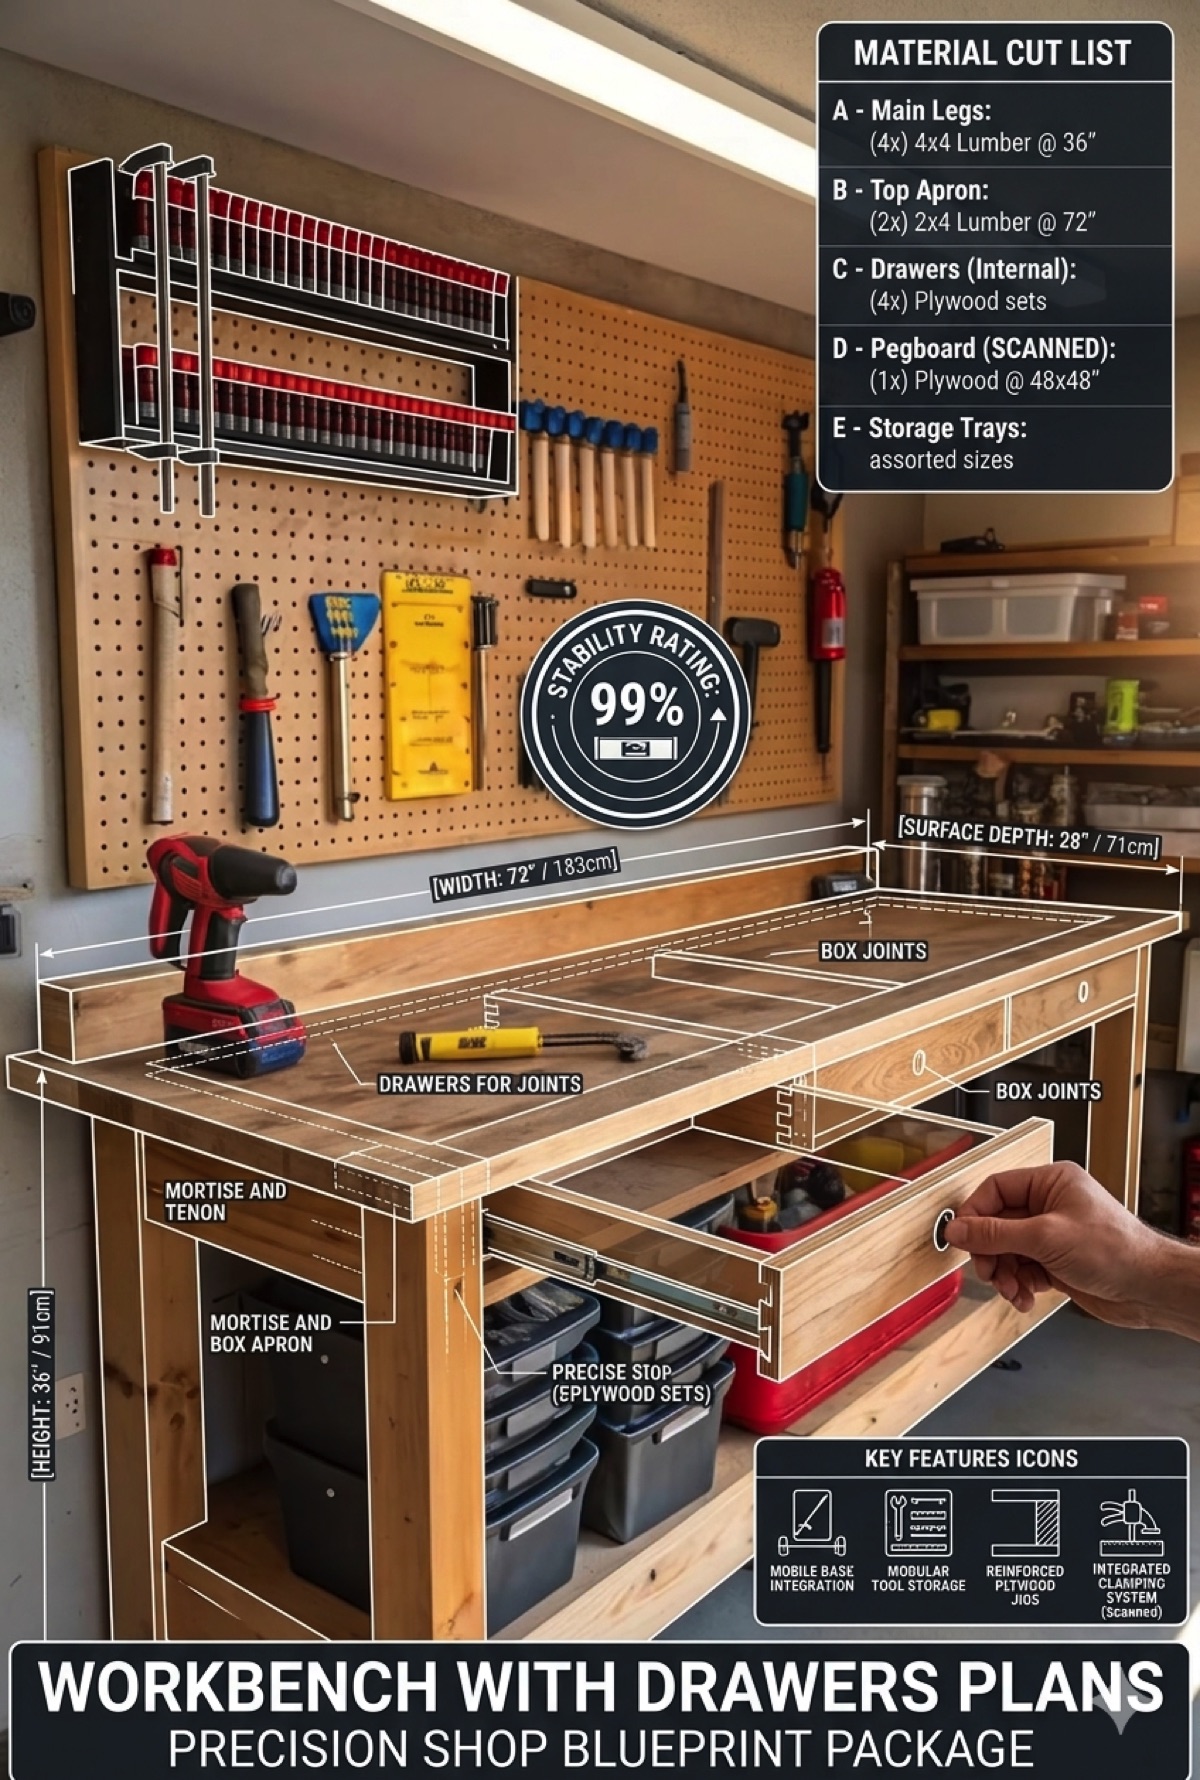
If organization is your primary focus, our Workbench Drawers Plans show you how to utilize every cubic inch of space beneath your work surface.
Building a Cohesive Maker Sanctuary
Every individual project you build should contribute to a broader, harmonious environment that inspires your best work.
We believe in a systematic approach to shop design that you can explore in depth within our Woodshop Organization and Workshop Layouts section.
This collection of expert resources ensures that your benches, tool walls, and machinery stations all speak the same “design language.”
By standardizing your heights and storage depths, you create a modular world where everything docks together with 100% accuracy.
If you are ready to stop guessing and start building with total confidence, access our complete vault of Schematic Blueprints.
These professional-grade documents remove the friction of planning, allowing you to focus entirely on the joy of the build itself.
No matter where you are in your journey, from your first cut to your hundredth commission, you can always find inspiration on our Homepage.
Transforming your shop is the best investment you can make in your craft; start building your professional foundation today.